


archive for 'handmade'
– father’s day silhouette pillow –

i made this pillow with clementine’s silhouette as a gift for ryan’s first father’s day! step by step photos below…
– gub
 |
| |
|


date of post: June 22nd, 2011 | category: baby, design, events, handmade, house, how-to, photography
tags: baby, design, diy, gub, handmade, house, how-to, photography
comments: 2
– thank you cards –

i had a fun time making thank you notes this weekend and finally finished up writing the last of them from all of our awesome baby showers. the new work room set-up is GREAT! next project: felt mobile for nursery…
– gub
|
| |
|


date of post: May 23rd, 2011 | category: baby, design, handmade, house, how-to
tags: baby, design, diy, handmade, house, how-to, photography, ryan & gub
comments: none
– nursery transformation: week thirteen –

we are almost done with the nursery, as the baby could arrive anyday now… gub is 38 weeks along, so just two weeks away from our due date. we are adding some final touches to the nursery…
gub made some paper garland using red and white baker’s twine and two different sized circular die cutters. it turned out super cute! she might make more to hang from the wall shelves.
we also hung up some more artwork, including a little grouping near the file cabinet corner: one of our vintage paint by numbers, a lisa congdon collage and a few other fun pieces. we put up a couple of little gocco screen prints by matte stephens as well.
– gub & ryan
check out our week 1, week 2, week 3, week 4, week 5, week 6, week 7, week 8, week 9, week 10, week 11 and week 12 nursery posts!
|
| |
|


date of post: May 22nd, 2011 | category: baby, design, handmade, house, how-to, nursery
tags: baby, design, handmade, house, how-to, nursery, photography, ryan & gub
comments: 1
– nursery transformation: week nine –

we accomplished several things on our list this weekend… we finally made the roman shade for the nursery window as well as a cushioned seat cover for the built in bench. both were made from this cute fabric we purchased a while ago from whipstitch, an amazing fabric store here in town. we’ve included some step by step photos below. both projects turned out great!
we also received a rocking chair as a gift from gub’s mom this week, which resulted in re-arranging everything in the room once again. and we hung up a few pieces of artwork. slowly but surely, it’s coming together…
– gub & ryan
check out our week 1, week 2, week 3, week 4, week 5, week 6, week 7 and week 8 nursery posts!
|
| |
|


date of post: April 24th, 2011 | category: baby, design, handmade, house, how-to, nursery
tags: atlanta, baby, design, diy, handmade, house, how-to, nursery, ryan & gub
comments: 2
– bottle rocket brewing –

once upon a time, my buddy willy and i brewed quite a bit of beer under the name bottle rocket brewing. we hosted gatherings where we grilled out and shared our beer with friends. summertime favorites were our watermelon wheat and orange cream ale, both went quickly when we had them on tap.
most of our friends also chipped in and designed labels for our beers. the labels were a big part of the fun we had! you can see all of the different label designs on the bottle rocket website, or flip through them here.
although it’s been awhile since i’ve brewed, i hope to get back to brewing soon!
– ryan
|
| |
|


date of post: February 25th, 2011 | category: beer, brewing, handmade, how-to
tags: beer, brewing, handmade, homebrew, photography, ryan
comments: none
– blackberry & cherry cobbler –
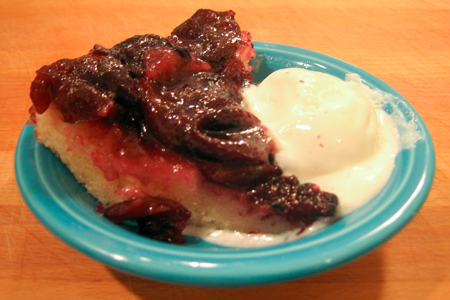
we were able to find lots of yummy fresh blackberries & cherries at the store this week. the blackberries were not super ripe yet and ry was having me try bites of them together with the cherries. the combination of sweet and sour was so good we decided to make a blackberry & cherry cobbler!
we used the basic (add any fruit) cobbler recipe from the first paula deen cookbook & finished with ice cream.
– ryan & gub
blackberry & cherry cobbler recipe:
ingredients:
8 tablespoons (1 stick) butter
2 cups sugar
1 cup water
3/4 cup self-rising flour
3/4 cup milk
2 cups fresh sliced fruit (we used blackberries & cherries)
directions:
– preheat oven to 350 degrees
– put butter in deep baking dish and place in oven to melt
– clean and slice fresh fruit, place in a bowl and sprinkle with some sugar
– add the fruit, 1 cup of water and 1 cup of sugar to a saucepan
– bring to a boil and simmer for 10 minutes, stirring often
– mix 1 cup sugar and flour; add milk slowly to prevent lumping
– pour over melted butter in baking dish, do not stir
– spoon fruit on top, gently pouring syrup, again without stirring
– bake 30 to 45 minutes, batter will rise to top during baking
– serve with vanilla ice cream and/or whipped cream
|
| |
|


date of post: July 10th, 2010 | category: cooking, food, handmade, how-to, recipe, sweets
tags: cooking, food, handmade, how-to, photography, recipe, ryan & gub, sweets
comments: none
– fried green tomatoes –

we made fried green tomato BLTs for dinner last night and they were delicious! we used a tomato from our garden and had sautéed zucchini as a side, which was also from our garden.
to prepare, slice a green tomato and place on a plate or splatter guard. sprinkle salt on top and let the slices sit for a couple of hours. this will cause the water to drain out of the tomatoes for a better frying experience. pour off any excess water as it builds. when ready to fry, just dip a slice in egg wash and batter before frying in oil at medium heat. we used corn meal in our batter, but feel free to use flour.
– ryan & gub
fried green tomato recipe:
ingredients:
1-2 large green tomatoes sliced
bread, mayonnaise, lettuce & bacon (if BLTs are desired)
egg wash:
2 eggs, beaten
1/3 cup milk
batter:
1/2 cup corn meal
1/2 tsp salt
1/2 tsp garlic powder
1/2 tsp onion powder
1 tsp parsley
directions:
– clean tomatoes and slice
– place on a splatter guard and sprinkle with salt, let sit for a couple of hours
– pour off any excess water as it builds
– heat oil in a frying pan at medium heat
– dip tomato slices in egg wash and then in the batter
– gently place battered tomatoes in frying pan and fry until golden brown
– place on splash guard to let cool and drain the oil
– serve on toasted bread with mayonnaise, lettuce and bacon or with a dipping sauce
|
| |
|


date of post: June 22nd, 2010 | category: bacon, cooking, food, garden, handmade, how-to, recipe, summer
tags: bacon, cooking, diy, food, garden, handmade, how-to, photography, recipe, ryan & gub, summer
comments: none
– fried squash blossom –

we recently made some fried squash blossoms from our garden that were delicious! we were getting frustrated over the amount of flowers falling off our plants but it turns out they were male flowers that don’t grow fruit. gub remembered having fried squash blossoms in italy so we found a recipe and did some frying.
to make these tasty treats, first gather and clean some squash flowers. next dip the flowers in egg and batter before frying them up in some oil at medium heat. it’s the same as frying anything, you’ll just want to use a light batter since the flowers are so delicate. we went with corn meal and loved it!
– ryan & gub
fried squash blossom recipe:
ingredients:
fresh squash flowers
whipped cream cheese for stuffing (if desired)
egg wash:
2 eggs, beaten
1/3 cup milk
batter:
1/2 cup corn meal
1/2 tsp salt
1/2 tsp garlic powder
1/2 tsp onion powder
1 tsp parsley
directions:
– clean squash flowers
– stuff squash flowers with a little whipped cream cheese if desired
– heat oil in a frying pan at medium heat
– dip squash flowers into egg wash and then batter
– gently place battered squash flowers in frying pan and fry until golden brown
– place fried flowers on splatter guard to let cool and drain the excess oil
– serve hot
|
| |
|


date of post: June 15th, 2010 | category: cooking, food, garden, handmade, how-to, recipe, spring
tags: cooking, food, garden, handmade, how-to, photography, recipe, ryan & gub, spring
comments: 6
– horseshoe pit makeover –
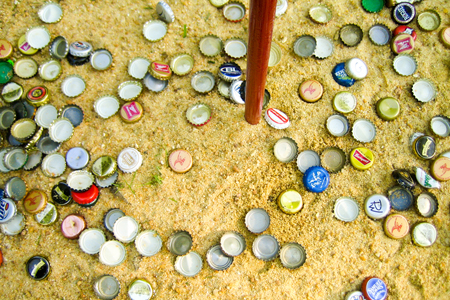
we noticed our horseshoe pits were looking rough recently, so we decided to give them a face-lift. we started by getting rid of the weeds and adding more sand. that alone made a huge difference. then we spray painted the poles bright colors, we went with blue and red, and topped it all off by adding our bottle cap collection.
we’ve been saving bottle caps for years, although we never really found the right use for them. gub has fond memories of her grandparents general store where they threw caps from soda bottles out front for gravel. the rusty gravel must have made an impression on her, we’ve been saving bottle caps since i’ve known her.
we’re excited to find a new use for our bottle caps! it’s gratifying to reuse something that could easily be thrown away. we plan on filling our pits a good bit more, our collection seemed a lot bigger inside the house. we are going to ask our local bartender to save bottle caps for us to help the cause.
– ryan
|
| |
|


date of post: April 16th, 2010 | category: handmade, house, how-to, photography, reuse
tags: diy, fun, handmade, house, how-to, photography, reuse, ryan
comments: none
– happy easter –
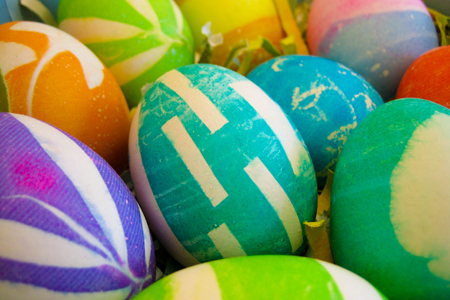
we celebrated easter by spending a fun morning drinking coffee and dyeing easter eggs in our new yellow kitchen. there will be a blog post on the kitchen re-do later, but here are the steps we took to create our colorful and recyclable eggs:
– hard boil eggs
– set up easter egg dye kit (we used a cheap grocery store paas kit)
– add stencils and resists to the eggs*
– stir dye bath and carefully place egg in the dye
– leave egg in the dye for 5 to 10 minutes (lighter colors take longer)
– remove from dye and remove stencil or resist
– place eggs in basket or nest (we used shredded paper scraps for our grass!)
*we created leaf stencils by picking small leaves from our yard and placing them on the egg. we then tightly wrapped panty hose around the egg and secured with a rubber band. small, thin leaves with few veins work best for the stencils. we also used electrical tape to add stripes and lines to the eggs.
yay easter!
deviled eggs for dinner!
– ryan & gub
|
| |
|


date of post: April 4th, 2010 | category: design, events, handmade, how-to, photography
tags: design, diy, events, fun, handmade, how-to, photography, ryan & gub
comments: 1